Posted in Cosplay, YouTube

My First Cosplay! First Update

Hello there! How’s it going? 🙂

I’ll just get to the point – I finally decided to make my first cosplay! YAY! I am SO excited about this!

So this will be my first update on my progress so far. If you want, I’ve also recorded a YouTube video about it, so if you’d rather just listen to me talk about it instead of read, here’s the video!


Anyway, if you’re still reading this, I decided I was going to cosplay as Asuna from Sword Art Online. Sword Art Online is an anime about a video game that traps its players in the game, and the only way out is to beat the final boss on the 100th floor. Asuna is one of the main characters, or at least she is to me, and she’s a BAMF. I adore her and I love her outfit! So, I decided I was going to make it, and I knew exactly where I was going to start: her skirt. 

Before I get any further, here’s a picture of Asuna!

Image result for asuna

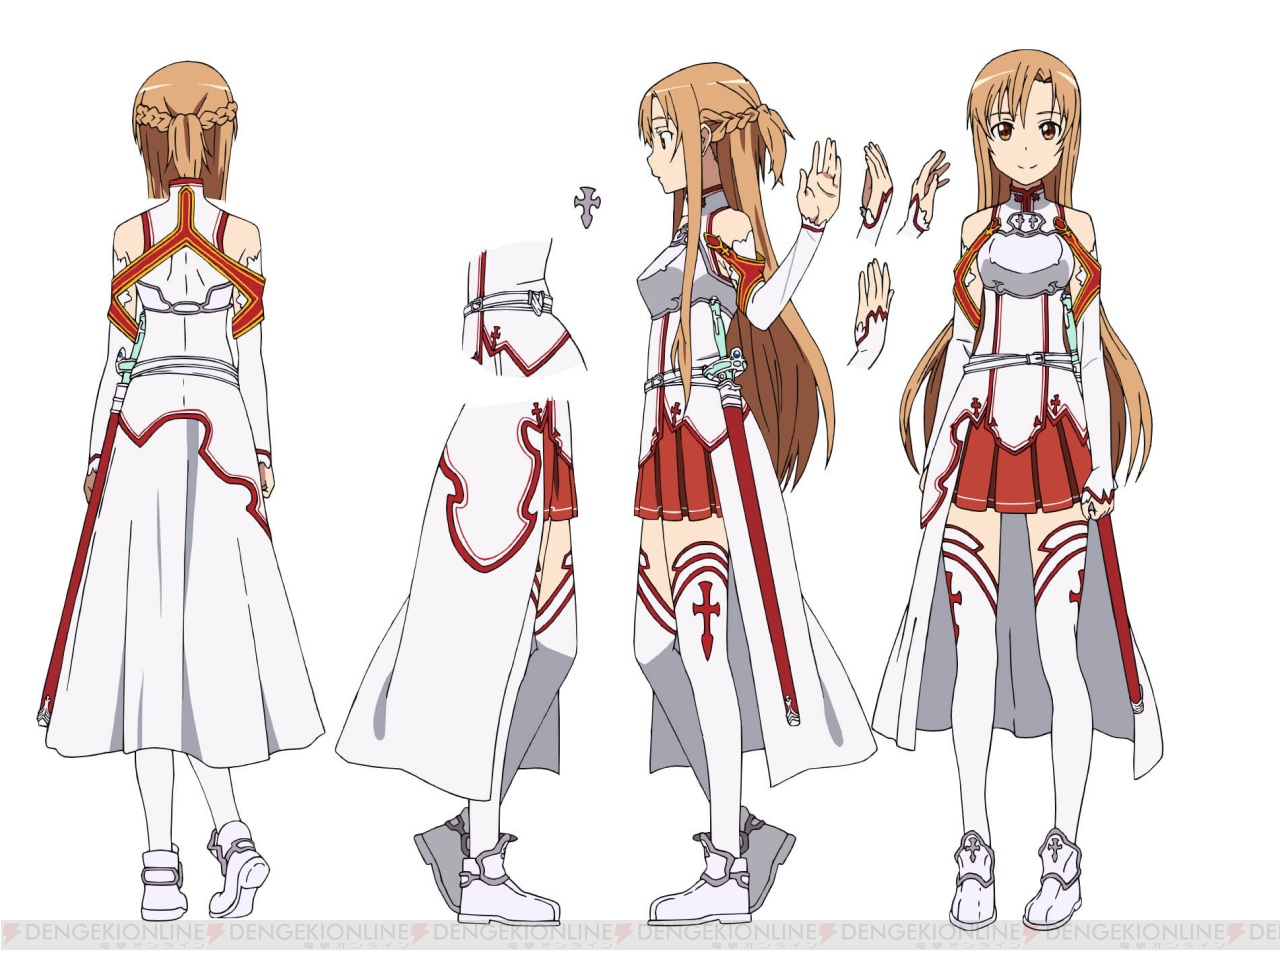
The picture is just pulled from Google Images, I do not own it.

So! First I started with the skirt. It’s pretty much a simple pleated skirt with a white stripe close to the bottom. There is a bit of space between the pleats as well. It stops at above the middle of her thigh, so it’s kind of short, but that’s okay!

This skirt was NOT simple though…

So what I did first was measure my sides where I wanted it to sit. I measured at 30 something inches around, I don’t remember the actual number at this point. Then I doubled that number and gave about 8 inches extra, because I planned for the pleats to be 2 1/2 inches wide, and I needed space between the pleats.

What I ACTUALLY ended up doing was 3 inches wide though… I don’t know why! I just spaced out I guess and didn’t realize until it was all pinned up and ready to go. So I left it. But I first sewed a hem for the bottom of the skirt, just by folding it over once.

Then, after I pinned the top down, I pinned the bottom of the skirt so that I could iron the pleats down. This made it solid and ready to go for sewing. After I ironed it, I sewed the top portion so that the pleats would stay in place.

After that, I realized that the skirt was not going to sit where I originally wanted it to (at my hips). So to make it fit I ended up pulling it up to my waist, which was fine because I made the skirt pretty long, just in case. This gave me room to work with a zipper and everything.

So then I folded the top over until I got it to where I ALMOST wanted it to sit at my legs. I then pinned this and sewed it down. Afterwards, I folded over the bottom again, so it sat exactly where I wanted it to, and sewed that. Now I had a pretty good looking bottom hem and a nice thick top piece.

Everything seemed perfect at this point – I was in a groove and was going at it full force! I then needed to cut the skirt down width-wise so that it fit my waist around. I pinned where the cut would be and then cut along that line, giving about an inch or 2 of extra room just in case, to start out with.

After I cut it I tested the width and decided that I did need to cut more. So, I did! I cut it down, leaving a top extra piece so I could put a hook in for extra security, and then sewed where the zipper wasn’t going to be. Then, I placed the zipper, pinned it, and then sewed that down. I’d like to say that I did an AWFUL job at sewing the zipper down… I did my best though!

So now I have what I think is an almost completed skirt, minus the white stripe. I try on the skirt and SOMEHOW it was too big still! I’m sitting there thinking “What is HAPPENING!?” and I decided to use that extra top piece to hook the skirt to actually fit. So now that skirt has an overlap in the back. Oh well I guess…

So now the skirt fits. YAY! Now I just have to get the white stripe on.

Man I should have put it on first. 

It was SO hard to get that stripe down on the skirt without it being folded and loose against the fabric. I had to get help to do this. But I got the stripe pinned down and started sewing it in place. It took a bit of time but it worked out in the end. I then had to re-pin the bottom down so I could iron it again, and after I ironed it, it looked great! I was so happy! I now had a finished Asuna skirt! 

This was a fun and difficult experience, and I can’t wait to finish the cosplay! I did work on her sleeves and legs as well, but I think this post is long enough. I’ll make another one of these when I finish the sleeves and one for the leg pieces as well. Hopefully that will be soon!

Also, here’s a picture of my finished skirt!

wp-1488418237918.jpg

So that’s it for today! If you do want to see what I’ve done with the sleeves and leg pieces, you can check out my video, towards the end. I hope you enjoyed this explanation of my experience, plus you made it to the end, so congrats!

As always, Stay Happy, Stay Strong, Be Free!

~^-^~ Annastasia


Posted in Random Crafts

Heart String Banner

Hello there! How are you doing today? 😀

Today I will be talking about an ADORABLE long heart banner! It’s getting closer and closer to Valentine’s Day, so why not do something for it? Exactly. So let’s go!

First, gather your materials. You’ll need:

  1. Scissors
  2. Cute craft paper
  3. Twine or string or thread or whatever you want to use – I used twine actually
  4. Tape or glue
  5. Pencil or pen
  6. Patience 🙂

Gather your papers together first. Decide the color scheme for your banner!

wp-1485467424259.jpg

Then, flip your papers over to the back side and start tracing or drawing hearts on them, whatever sizes you want! I chose to hand draw mine, because I didn’t care if it was perfect or not, but if you’re a perfectionist or just want your hearts to be the same size and shape, that’s okay! You do you!

wp-1485467463042.jpg

Afterwards, cut out your hearts! Just do the best you can!

wp-1485467480151.jpg

Once you have all of your hearts cut out, lay them out in the pattern that you want them to hang in.

wp-1485467510998.jpg

Then you will cut out your twine or ribbon or whatever you’re using. I laid the twine down along the hearts to get the length I needed. I had 6 rows of hearts so I cut out 6 pieces of twine. Don’t forget to cut a piece for the length across the top as well! I would leave a bit extra on each side.

wp-1485467534034.jpg

Then lay the first piece of twine down and start taping or gluing your hearts onto the twine. Do this for each column.

wp-1485467606178.jpg

Lay the columns out as evenly as possible and then put the piece for the length at the top wherever you want it to be.

wp-1485467649129.jpg

Start tying the columns onto the length piece. If you put it in the wrong spot, that’s okay! You should be able to move them after they are knotted.

wp-1485467805299.jpg

And there we go!

wp-1485469146933.jpg

wp-1485469164076.jpg

I hope you had fun making this adorable heart banner! The good thing about it is that you can adjust it however you want! You can make it very long and use it as a headboard like thing, you can make a bunch of columns and use it like a curtain or something and hang it in front of your door, you can do a lot!

So that’s it! As always, Stay Happy, Stay Strong, and Be Free!

^-^ Annastasia

Things used in this project:

  1. Scissors from I don’t remember
  2. Paper from Hobby Lobby
  3. Twine from Hobby Lobby
  4. Pencil from my Roommate Sunny
  5. Tape from my Roommate Sunny


Posted in Random Crafts

Happiness Jar

Bonjour!

Every now and again we go through periods of time where we can get sad, depressed, and we just can’t remember the good things that have happened in our lives. Well, it’s the beginning of 2017, and I have a way for you to catalog your happy memories and moments – a happiness jar!

Now, you could do this a very simple way if you want: take scraps of paper and write down the happy memories or moments, then place the scraps in a jar. But I wanted to go more intricate with it. I decided to learn how to make “lucky stars”. I tried to link the video but it wouldn’t work, so the title is “how to make lucky stars origami – paper crafts” on Yuliya Part VLOG’s channel. They’re basically puffy stars!

So here’s where the tutorial comes in – making the stars!

First off, collect your cute paper.

wp-1485384686950.jpg

Take a ruler or something that has a straight edge and make a line down the paper, creating a long thin strip. You don’t want it to be too wide!

wp-1485384720138.jpg

Try to do a better line than what I did… >.>

Then, cut the strip out as evenly as possible.

wp-1485384750953.jpg

And there’s your strip!

wp-1485384779112.jpg

Take your strip and face it towards you, color side facing you. Wrap the top of the strip over itself, creating a ribbon shape. Make sure to have a good amount hanging over the side.

wp-1485384829410.jpg

Then tuck the piece that’s hanging over into the loop that you just created.

wp-1485384870861.jpg

Begin pulling down on the rest of the strip, tightening the knot you’ve created. It should look like this.

wp-1485384908174.jpg

I made quite a few of these stars, and I’m honestly not sure if it’s better to crease the folds or not. It seemed like it didn’t make much of a difference to me, so do as you please! If it does affect it, let me know please!

Now, fold that edge that’s hanging off onto the knot you’ve created. Once you have that one creased, which I know you’re supposed to do :), tuck it into the knot.

wp-1485384938117.jpg

Like so.

After that, you just start folding! It should naturally fold along the edges, creating a pentagon shape. So fold…

wp-1485384973826.jpg

And fold…

wp-1485385055461.jpg

And fold some more…

wp-1485385091230.jpg

A few more times…

wp-1485385122923.jpg

Just a bit more…

wp-1485385167609.jpg

Almost there!

wp-1485385204859.jpg

Perfect! Now, take that extra little bit and tuck it into the last fold, so it looks like so.

wp-1485385238673.jpg

And there we go! There’s the base for your star.

wp-1485385265611.jpg

Now, what you’re going to do next is actually puff out the star. To do this, you’ll take your finger or fingernail and press into the sides, like so.

wp-1485385295858.jpg

Do that to all 5 sides. It should puff up the center and create the corners for the stars.

And there we go! There’s a star!

wp-1485385343709.jpg

Now, I did come across a problem. Everything was fine until I had to push on the sides of the star. Sometimes it would puff up, sometimes it would fold in on itself. I don’t really know what I was doing wrong, so I can’t give you any advice on that, but I can at least tell you about the problem. Here’s an example of the problem.

wp-1485385379732.jpg

It’s the same type of paper, yet it did the exact opposite thing. I have no idea why!

Here’s another that was made.

wp-1485385431491.jpg

Now here’s a choice for you: you can either just put stars in the jar to remind you of the good things, or you can write down the good thing on the back of the strip! Then, at the end of the year, you can look back at exactly what happened!

wp-1485385488694.jpg

Here’s a shot of what I started out with!

wp-1485385546975.jpg

And here’s what I mostly ended up with.

wp-1485385591153.jpg

And there you go! Here’s my jar with what I decided to start out with. I’d say I’ve had about that much happiness this year, if not more. I would say to cut a bunch of strips out and keep them in a drawer or something, so that you can just grab one and go with it!

wp-1485385747019.jpg

wp-1485385795772.jpg

wp-1485385824092.jpg

wp-1485385854409.jpg

So there’s a happiness jar for you! I hope this helps make your year a bit easier by seeing all of the happiness sitting there on your shelf. I bet it will overflow!

Here’s the link for the video as well. Check it out! It might help!


As always, Stay Happy, Stay Strong, Be Free!

^-^ Annastasia


Things used in the images:

Scissors from I can remember they’re old

Paper from Hobby Lobby

Paper book from Hobby Lobby

Pencil from my roommate Sunny 🙂

Jar from a coworker of my boyfriend

Guess Who game from Goodwill

Background from Hobby Lobby

Heart banner made by me (a future tutorial!)

The Giver by Lois Lowry

And Then There Were None by Agatha Christie

Drawing book from I don’t remember it’s also old


Posted in Random Crafts

Origami Bow

Hello there!

I was searching online for something to do with the cute papers that I have collected and I came across a YouTube channel called PaperMade – Origami & Crafts, and I saw their video on an Origami Bow and I thought it was ADORABLE, so I decided to pass on the info to you guys so you get a chance to make this adorable bow! I take no credit for this tutorial, I’m only trying to pass on the information. I did not come up with this idea. Please check out their video if you want! It may also be easier for you to see the person actually doing it instead of just pictures, but hey, try it out!

Also, I haven’t gotten a proper place to craft yet, so for this tutorial and my next few ones are going to be done on this Guess Who? box on my roommates bed… SORRY. I know it’s not professional and I apologize, I will get my desk soon. Please forgive me! 😦

So here we go, here’s how to make PaperMade‘s awesome Origami Bow!

NOTE: When I first started making this bow, I made it backwards. So when I start out with the colored side of the paper showing, I actually needed the white side showing. If you have double sided colored paper then you won’t end up with a white bow like I did, but it still looks adorable so I kept it! 🙂 Just please use the opposite color side from what I’m using if you don’t want a white bow.

Step 1: If you have a rectangular piece of paper, you need to cut it into a square. You can do this by actually doing your first fold, which is a diagonal fold, corner to corner. When you crease it, it will create a square! You can then cut off the excess paper and you’ll have a square!

1

You can see in the picture above that I went ahead and made that crease, but here is my rectangular piece of paper.

2

Here’s how the fold should look. You should have a  triangular piece. Then cut off the excess like so.

3

You can use that excess piece for another craft, so make sure to keep it! 🙂

Step 2: Unfold the paper and do another diagonal fold, so you have 4 mini triangles.

5

Step 3: Have the paper open. Do a horizontal fold this time, straight edge to straight edge. Do this to both sides.

6

The next image is what it should look like unfolded.

7

Step 4: In the picture above I am pointing to a specific fold. What you will do is fold this crease and the crease across from it in, so that you get a diamond shape in the front and back, as seen in the next few pictures.

8

9

10

Step 5: Take the top part of the diamond, the part that is NOT open, and fold it down.

11

Step 6: Open up the paper and it should look like so.

12

Then, take your fingers and make a firm crease along the box that was just made. Make sure to do all 4 sides!

13

Once that is done you should be able to fold the paper like so, with the box laying flat on top and the two corners that we previously folded in folded back in again. You should almost have your diamond back, just without the top part!

14

Step 7: Begin pushing slightly in the center of the square you have created, while also pushing in on the sides where it is already folded in at. You should make an hourglass shape with the box.

15

Continue flattening this piece until it looks like so.

16

17

Step 8: Lay the paper down as it is and begin folding each side by taking the top corner and folding it so that it lines up with the center crease, creasing the fold you just made.  You should have to do this 4 times.

18

It should look like the next image on both sides.

19

Step 9: Open up the paper. It should look like this (I forgot to take this picture from my first bow so here’s my second bow. I did this one correctly so the colors show :3 )

20

Then, look at the sides of the paper. You should see where it is folded over on all four sides. You’re going to cut at that fold on all 4 sides, as seen below.

21

22

This was honestly the hardest part for me, cutting along that line. I missed both times. :/ But that’s okay! It doesn’t have to be perfect. After cutting all four sides, it should look like this.

23

Step 10: Fold over one of the top diamond pieces. It should look like so.

24

Then turn it so that it is pointing up, and begin folding the bottom flap so that it lines up with the crease in the center of that side. Do this to both sides on the bottom.

25

Once you do that to the bottom, flip the middle pieces down and do the same to the top.

26

Once you do that it should look like this.

27

Here’s what it should look like from the front.

28

Step 11: Cut down the center of the center flaps. This will create the bows tails.

29

Step 12: Take the outer side of the bows tail and fold it so that it has a straight edge going down the center as shown. You’ll only be able to fold it so far anyway or else the paper will rip. 🙂

30

Then fold the other side of the tail over on top of the first fold. Once again, you’ll only be able to fold it so far before it starts to rip.

31

Repeat for the other tail.

32

Here’s how it looks from the front!

33

At this point, you can cut the tail to look however you want it to. I personally liked how it looked here so I kept it, but you’ll see on my other bow that I cut the tail. Up to you!

Step 13: Flip it back to the front and take the top right bow part and tuck it under the square in the center. Do this for both sides.

34

35

And voila! You have made yourself a bow!

36

Here’s some shots of the two bows I made.

37

38

There’s many things that you can do with these bows! You can use them as decorations for boxes or photo frames, hang them from strings and make a string of bows, tape them or tack them to the walls or to cork board, many things! It’s up to your imagination! I personally stuck them to our poster board for more pics.

3940

There you go! Cute bows to decorate with and to be creative with! I hope you enjoyed this step by step tutorial and I hope to hear that you’ve tried it out and what you’re going to use them for! Check out the video as well!

That’s it for me! Hope you guys have fun!

As always, Stay Happy, Stay Strong, Be Free!

^-^ Annastasia

Things used in this tutorial:

  1. Poster board from Hobby Lobby
  2. Tape from Office Depot
  3. Paper from Hobby Lobby
  4. Scissors from I cant remember they’re old…
  5. Tutorial from YouTube
  6. Guess Who? 1998 version from Goodwill


Posted in Random Crafts

Cute Banner :)

Hello!

So while I was getting things together for taking pictures of my projects, my roommate and best friend Sunny suggested we craft ourselves a banner – a cute banner to put in the background of the pictures!

So here we are: a step by step tutorial of our cute banner!

First: materials

supplies

You’ll need:

  1. Cute papers to cut into triangles, however many you want
  2. Cute scissors to cut the papers into the triangles
  3. Twine or thread or ribbon – I used twine
  4. Tiny clothes pins to hang the triangles

Now! Step 1: Cut the papers into triangles. Whatever sizes you want! I chose to do mine small, and I had 5 papers and 20 clothes pins, so 4 triangles from each different paper.

triangles

Step 2: Cut your twine or thread or whatever you decided to use to the length that you want it. Then, add on your triangles by clipping them onto the twine with the clothes pins. You can put them as close as you want – your project, your way!

1st-set

And that’s how you make it! Mostly. You see, we ran into a problem…

problem

The clothes pins were too heavy, so the pretty colors weren’t showing! So, we have two ways of solving this:

  1. Tape a coin to the back if your triangles are big enough. This will weigh it down and keep it flat. I did this to only one of my triangles because mine were too small.
  2. Put tape to the back of a few of the triangles and tape them to the wall or whatever you are hanging this against. This is what I did.

finale

You can see the tape from the side, but I’m not worried about that. My focus is the front of the look, not the side. If you want to try to avoid this problem, I would say get glue or tape to put the triangles on the twine, or pull the twine tight so they don’t have a chance to turn upside down. We wanted the clothes pin look though, so we kept it as is.

fixed-it

And there you go! Final look! If I did this again (which I probably will because you can NEVER have enough decorations) I would make my triangles a bit bigger probably, and select bolder colors. But I had fun doing it, and that’s the point!

Here’s some examples of the finished product.

1

3

2

4

That’s it! Let me know if you try this out and how it turns out!


Books in the images:

  1. Soulless by Gail Carriger
  2. Sharp Objects by Gillian Flynn
  3. Specials by Scott Westerfeld

Tree from Goodwill

Backgrounds from Hobby Lobby


Thanks for checking this out! And as always, Stay happy, stay strong, be free!

^-^ Annastasia